
Top tips to boost combine output
Optimising combine harvester output is a difficult task that can often involve a degree of guesswork.
Ever wondered how manufacturers’ product experts can identify problems so accurately? It’s all down to a painful-sounding process called a “Kill-Stall”.
In effect, you get the machine running at regular speed, full of crop and then kill the engine.
Now that might sound reckless and potentially perilous for all those precision-engineered belts, pulleys, gearboxes and bearings but it’s not. And, it’s the only way to get a truly accurate snapshot of how individual parts of the combine are performing.
This “freeze-frame” technique is used by combine specialists the world over to identify bottlenecks, hotspots for losses and engineering weak points.It’s a fairly straightforward process that can easily be done in the morning before moisture levels drop low enough to get going properly.
Kill-stall
First job is to get the combine working in normal conditions. Then, about halfway across the field in a section that best represents the overall crop, kill the engine.
This is done in a number of ways, depending on the machine. Some will just require the ignition to be flicked off while more modern harvesters will have a designated function key that stops the engine and holds oil within the various clutch packs.
As the engine comes to a stop, gently apply the brakes. This will leave crop material as it was during actual harvesting.
Immediately disengage the threshing system and header and restart the engine to re-instate oil-flow to the cooling turbo. Run it for five more minutes before switching off – this will also give time for the dust to settle.
Following the simple steps in each of the tabs will identify the areas for improvement.
Sample
Check the make-up of the sample – this will give a good outline of which areas need most attention.
Trash in the tank points to over-threshing or a fan that is set too slow (see fan speed setting section 5). First increase concave clearance and then consider reducing drum speed. (Remember high drum speeds give lots of centrifugal force which is the best way of separating grain).

Cracked grains can indicate that the concave is set too close to the drum. Rectify this in 10mm increments and only adjust drum speed if there is still a problem.
Damaged grains are often due to slack in intake clean grain or returns elevator chains. Check for play and adjust as necessary.
Crop flow
Starting at the header, check that crop is evenly filling the full width of the elevator by opening either the intake elevator access door or stone-trap.
If the crop is not filling the entire width, output will be limited. To even out the swath of material, short bolt-on sections of auger flights can be added or removed. Retractable fingers can also be repositioned to ensure crop is fed evenly into the elevator.
Failure to get this right will mean your entire threshing and separation system is working at a reduced capacity.

Drum
Remove side panels to get free access. Examine the concave to see how far back unthreshed ears appear.
If you can find them right at the back of the concave then the drum needs to be running faster or the concave needs closing up.
Where unthreshed tips are an ongoing problem, rather than using de-awning plates, New Holland recommends fitting rub-bars (up-turned rasp-bars) to the front two concave sections to enhance threshing. These are better than de-awning plates which reduce separation area without offering more effective threshing.
A tough straw kit is also available for the post concave crop beater – toothed bars provide a more aggressive action.
Grain pan
If unthreshed ear tips are appearing at the front of the grain pan, speed up the drum and then close up the concave. If problems persist, then consider fitting some form of enhanced threshing device.
Speed up the drum and only once maximum rpm is reached start to tighten the concave.
If unthreshed tips persist on the grain pan, shut down the bottom sieve to channel them back through the returns system for re-threshing.
On certain New Holland combines returns cleaning is improved by a toothed rotor and housing at the base of the returns elevator. Set too tight, these can cause cracked grains. Adjust clearance accordingly.
Sieves
If the sieve is totally covered, increase the fan speed. If the front half is clear decrease the fan speed. Heavy top sieve loadings can also be caused by over threshing in dry brittle crops, reduce the aggressiveness of the threshing system to help.
If there is some grain on the rear third of the upper sieve, open it slightly to allow the grain through to the lower sieve.

Sample quality can be impacted by closing the top sieve, try not to have the top sieve as wide as possible to stop grain loss as this could have the opposite effect with a dirty sample.
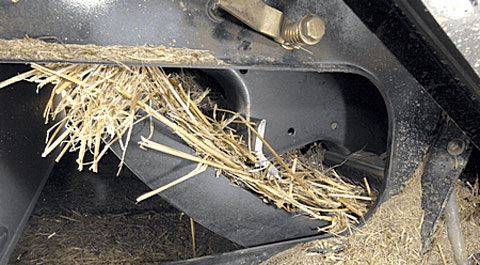
Returns
A good starting point in cereal crops is to aim for a 5mm difference between top and bottom sieve openings. This is the key to getting the returns sample right. It should be a good mix of unthreshed ears and trash with hardly any clean grain.
Check the volume of material at the top of the returns auger. If it is more than half full of trash then the top sieve needs closing.
If there is clean grain in the returns then the bottom sieve needs to be opened up.
Closing the sieves down narrows the channel of air from the fan, increasing the actual air-pressure and thus boosting cleaning ability. In effect, closing the sieves has the same effect as increasing fan speed.
Walkers
From the access hatch above the straw walkers, grab a couple of good handfuls of straw and shake. If grain can be heard falling onto the tin-work this can be classified as walker loss. Either speed up the drum, tighten the concave or slow forward speed.
